Surfski Repair
Surfski Repair (Step by step guide)
While standing on a floating dock and removing the boat from the water one evening, my grip slipped and it fell on a dock tie. The impact placed a small indent in the ski. I knew I was in trouble because I knew nothing about boat repair. I immediately called my friend & surfski training partner Brent. He offered to help each evening after work to repair the surfski. I quickly realized that my seemingly bad situation had afforded me a great opportunity to learn from someone who has extensive experience in professional auto body repair and had repaired surfskis before. If this ever happened again in the future, I would have the experience behind me to fix it myself. In repairing the ski we wanted to create a solid repair that didn't add unnecessary weight, was easy on the budget and made the ski look like it did originally. Below are the steps we took to repair it:
1. Create cardboard cut out of the hull curve so that as we repair the hull, we can see if it is matching the correct curve. You will use this at the end of the filling and sanding.
2. Be careful to understand the anatomy of your ski before cutting in or drilling. The bow has ribs running across the ski. You can see those if you look up the drain hole. The back of the ski from the seat to the tail has one long center brace. This brace runs from the seat to approximately a foot before the tail. Make sure not to cut any of the supports or you will need to do the interior repair before fixing the intended spot. Drill 4 holes ensuring that they are far enough beyond the fractured area of the hull. The drill holes will create corners that will not spider after the patch is cut out.
3. Using a handheld hacksaw cut between the drill holes to create a hole. I selected a relatively square hole but you could also cut a circular hole. Remove the section.
4. Measure a spot on the opposite side of the hull that is in approximately the same area, the same curve, so that you can create a mold for the patch.
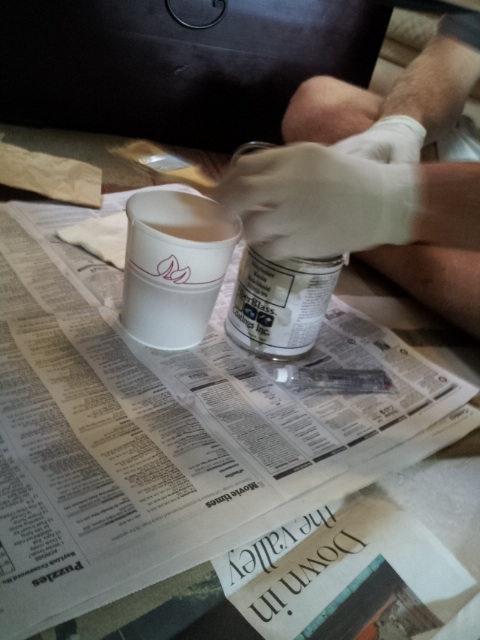
5. Tape down wax paper over the opposite side section you have selected. Mix fiberglass resin & hardener in a thick paper cup. Do not use a plastic cup as the resin will heat up and go through the bottom of the cup.
6. Lay one sheet of fiberglass mesh on the wax paper. Using a cheap brush (because you will throw it away) lightly and smoothly coat the piece. Add the second sheet on top and repeat the process.
7. Now select 3 half toothpicks. Take some fiberglass mesh strings and dip them in the resin. Roll the toothpick tip around them to that they stick to the end like a q-tip full of resin. Stick the q-tip like the end of the 3 toothpicks randomly on what will be the top of the patch you just made. You may need to hold these upright for a few minutes. I suggest shorter pieces of a toothpick.
8. Allow the patch and toothpicks to dry overnight. This repair will take several days so be prepared to work for 15 minutes then wait overnight at several steps.
9. Ok, now your patch and toothpicks should be hardened. Remove from the wax paper and inspect. Now you can trim the patch down a bit. You only need to trim the patch so that a little will touch on all sides when it adheres to the inside.
10. Tilt the patch so that you can slide it inside. This is where the toothpicks become important. You will want to hold onto them to position it in place. This is the only reason for the toothpicks. Check to see if the patch curve matches the shape of your hull and will be a perfect base to start our repair. If not, go back & make a new patch.
11. If your patch curve matches the hull shape then the next step we take will be bonding it to the inside of the hull. Mix resin & hardener in a paper cup and using another disposable paintbrush, paint the outside edge with a thick enough layer of resin to adhere to the inside of the boat. Carefully tilt and slide the patch into place. Hang upside-down so that the patch will not slide as it dries overnight.

12. Inspect your repair. It should be solid and create a good seal all the way around the inside of the hole. Grind the toothpicks off smooth as you will no longer need them. With the bonded patch facing flat upward, mix the resin and fill all around the edges to ensure the seal is watertight. Allow drying overnight.
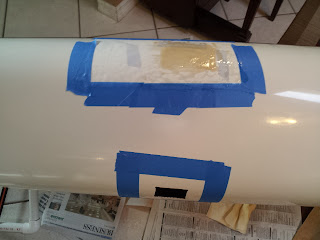
13. Now that the patch is dried to the inside, we must bond it to the outside. Tape off the area around the hole in the hull to prevent anything unwanted on surrounding areas. Cut two more sheets of fiber mesh (these fiber mesh sheets could also be done with carbon fiber sheets but at a much greater cost). Repeating the process we originally did to create the patch on wax paper, we paint a thin coat of resin and lay a sheet of mesh then paint in over smoothly. Then laying second sheet paint over it smoothly as well. Make sure to allow both sheets to be cut on all sides just slightly larger than the hole you are filling and paint resin to the edge of the hole. Allow drying overnight.
14. Using your compressor with grinder tip, grind off the outside edges of overlapping mesh leaving only the mesh in the center and the edge that is bonding it to the outside hull. Congratulations, your patch is now bonded to both the inside & the outside. The patch is now watertight, tough and the boat could be used at this point. It isn't pretty yet but definitely seaworthy.

15. Now we will begin filling in the hull. Make sure to tape off the area surrounding the patch. Mix the filler and fill more in the hull than needed as we will be sanding it down to a smooth level. Allow it to dry overnight. In the morning, check the hull shape against the cardboard cut out that we make in step 1.
16. Take a paint stick and hacksaw it off to a piece the length of your palm. Wrap it with 600 grit sandpaper. Keep the tape around the area so that you don't unnecessarily scuff the hull. Wet sand the filler down. Finish with wet sand 1500 grit to get it smooth. When sanding at any time, keep the paper well rinsed and wet. Sand North to South and East to West, never circular. Work sandpaper over the entire area so not create an uneven area.

17. Mix Gelcoat & hardener. Re-tape the area around the patch if necessary. Paint gelcoat with a high quality brush (natural hair) or spray a coat of gelcoat for this first layer. Allow to dry overnight.
18. Wet sand with 600 grit finishing with 1500 grit.
19. Mix Gelcoat & hardener to spray the final coating. Tape wider around the hole so that you can spray at least 2" further out. Allow to dry overnight.
20. Patiently wet sand with 1500 grit paper. You will know when you have it perfect because it will feather and there will be not shadows.
21. Finally polish smooth with Rubbing Compound. Your repair is now complete. Looks really good huh?! I am kinda surprised I could do it too.

22. Wax ski and hit the surf! I prefer liquid glass then flash wax to get it really slick for racing.

*** Lessons learned:
1. Gelcoat can fill for 1/8 of an inch but don't. Fill with filler, Coat with gel.
2. Be ready to have your ski out of the water for over a week, maybe two weeks.
3. Patience, patience, patience. This is a long repair if you want to get it right.
4. I would have bought some tint to darken my gelcoat more. The gelcoat I used was tinted to match the v12 which is a slightly lighter color than my V10L.
5. The fiberglass patch was light & strong as a carbon fiber patch so why spend the extra $$$ on carbon.
A single sheet of carbon fiber mesh this size could have cost $45-$50.
6. Don't be afraid to try it yourself. You can always give up and take it to a professional.
7. Share your knowledge & time to help others.
Supplies:


1. Create cardboard cut out of the hull curve so that as we repair the hull, we can see if it is matching the correct curve. You will use this at the end of the filling and sanding.
2. Be careful to understand the anatomy of your ski before cutting in or drilling. The bow has ribs running across the ski. You can see those if you look up the drain hole. The back of the ski from the seat to the tail has one long center brace. This brace runs from the seat to approximately a foot before the tail. Make sure not to cut any of the supports or you will need to do the interior repair before fixing the intended spot. Drill 4 holes ensuring that they are far enough beyond the fractured area of the hull. The drill holes will create corners that will not spider after the patch is cut out.
3. Using a handheld hacksaw cut between the drill holes to create a hole. I selected a relatively square hole but you could also cut a circular hole. Remove the section.
4. Measure a spot on the opposite side of the hull that is in approximately the same area, the same curve, so that you can create a mold for the patch.

6. Lay one sheet of fiberglass mesh on the wax paper. Using a cheap brush (because you will throw it away) lightly and smoothly coat the piece. Add the second sheet on top and repeat the process.
7. Now select 3 half toothpicks. Take some fiberglass mesh strings and dip them in the resin. Roll the toothpick tip around them to that they stick to the end like a q-tip full of resin. Stick the q-tip like the end of the 3 toothpicks randomly on what will be the top of the patch you just made. You may need to hold these upright for a few minutes. I suggest shorter pieces of a toothpick.
8. Allow the patch and toothpicks to dry overnight. This repair will take several days so be prepared to work for 15 minutes then wait overnight at several steps.
9. Ok, now your patch and toothpicks should be hardened. Remove from the wax paper and inspect. Now you can trim the patch down a bit. You only need to trim the patch so that a little will touch on all sides when it adheres to the inside.
10. Tilt the patch so that you can slide it inside. This is where the toothpicks become important. You will want to hold onto them to position it in place. This is the only reason for the toothpicks. Check to see if the patch curve matches the shape of your hull and will be a perfect base to start our repair. If not, go back & make a new patch.
11. If your patch curve matches the hull shape then the next step we take will be bonding it to the inside of the hull. Mix resin & hardener in a paper cup and using another disposable paintbrush, paint the outside edge with a thick enough layer of resin to adhere to the inside of the boat. Carefully tilt and slide the patch into place. Hang upside-down so that the patch will not slide as it dries overnight.

13. Now that the patch is dried to the inside, we must bond it to the outside. Tape off the area around the hole in the hull to prevent anything unwanted on surrounding areas. Cut two more sheets of fiber mesh (these fiber mesh sheets could also be done with carbon fiber sheets but at a much greater cost). Repeating the process we originally did to create the patch on wax paper, we paint a thin coat of resin and lay a sheet of mesh then paint in over smoothly. Then laying second sheet paint over it smoothly as well. Make sure to allow both sheets to be cut on all sides just slightly larger than the hole you are filling and paint resin to the edge of the hole. Allow drying overnight.
14. Using your compressor with grinder tip, grind off the outside edges of overlapping mesh leaving only the mesh in the center and the edge that is bonding it to the outside hull. Congratulations, your patch is now bonded to both the inside & the outside. The patch is now watertight, tough and the boat could be used at this point. It isn't pretty yet but definitely seaworthy.

16. Take a paint stick and hacksaw it off to a piece the length of your palm. Wrap it with 600 grit sandpaper. Keep the tape around the area so that you don't unnecessarily scuff the hull. Wet sand the filler down. Finish with wet sand 1500 grit to get it smooth. When sanding at any time, keep the paper well rinsed and wet. Sand North to South and East to West, never circular. Work sandpaper over the entire area so not create an uneven area.

18. Wet sand with 600 grit finishing with 1500 grit.
19. Mix Gelcoat & hardener to spray the final coating. Tape wider around the hole so that you can spray at least 2" further out. Allow to dry overnight.
20. Patiently wet sand with 1500 grit paper. You will know when you have it perfect because it will feather and there will be not shadows.
21. Finally polish smooth with Rubbing Compound. Your repair is now complete. Looks really good huh?! I am kinda surprised I could do it too.


After repairing the ski I added fresh vinyl lettering. I replaced the undersized bow lettering with v12 larger Epic letters and got new larger side lettering from Epic as well. The newer lettering does not have white between the letters that can yellow over time. Now my ski looks better than original.
*** Lessons learned:
1. Gelcoat can fill for 1/8 of an inch but don't. Fill with filler, Coat with gel.
2. Be ready to have your ski out of the water for over a week, maybe two weeks.
3. Patience, patience, patience. This is a long repair if you want to get it right.
4. I would have bought some tint to darken my gelcoat more. The gelcoat I used was tinted to match the v12 which is a slightly lighter color than my V10L.
5. The fiberglass patch was light & strong as a carbon fiber patch so why spend the extra $$$ on carbon.
A single sheet of carbon fiber mesh this size could have cost $45-$50.
6. Don't be afraid to try it yourself. You can always give up and take it to a professional.
7. Share your knowledge & time to help others.
Supplies:

Get a box and fill it with the stuff you will need
 Guide for mixing Gelcoat & Resin with hardeners


Compressor with grinding tip
will be used to grind toothpicks off and edge off of outside patch bonding
Paper cups & Fiberglass Resin

Resin & Gelcoat Hardeners

Fiberglass Mesh & Wide Painters Tape

Filler

Can of Fiberglass Resin

Can of Gelcoat
 Acetone cleaner


Rubbing compound to get smooth look to the gelcoat


Great. I have to fix mine. This article made me feel a little more comfortable.
ReplyDeleteYou can do it. It's really quite simple and inexpensive to do yourself.
DeleteYou can do it. It's really quite simple and inexpensive to do yourself.
Delete